
Introduction
Language translation is essential in our globalized world, bridging language gaps. Web apps are becoming more important for seamless communication due to the rising need for language translation services.
This article discusses creating a web-based language translation application utilizing ChatGPT and Streamlit. ChatGPT, an advanced OpenAI language model, can generate natural-sounding text responses from inputs provided. On the other hand, Streamlit is a powerful open-source framework for fast, easy data science web application development.
TL ; DR
- Use Chatgpt to create a Translator Web-app

Here we go....
I. Starting ChatGPT and Streamlit
Before building our language translation web application, we must set up our development environment and install the necessary packages. This section explains how to configure and install OpenAI with Streamlit.
ChatGPT's language model was created by OpenAI, which powers our web-based translation tool. To use OpenAI's resources, we will need to get an API key from the website. With the API key, we can install OpenAI using pip in our command prompt or terminal:
pip install openai
Next, we need to setup Streamlit, which is the framework we will be using to build our web app. We can also use pip to install Streamlit:
pip install streamlit
Now that OpenAI and Streamlit have been installed, we can now start building our translation web-based app.
For more information on ChatGPT, Streamlit, and the OpenAI API key acquisition procedure, check out my in-depth tutorial, Building a ChatGPT Web Application using Streamlit and OpenAI: A Step-by-Step Tutorial.
II. Developing the Translation Web-App
After installing the necessary packages, let us now see how to create the user interface for our language translation web-based application. Please follow this full guide:
- Name a new file app.py in your favourite Python editor. Please copy the code snippets into your file and save changes.
- Import the necessary packages to start coding:
# Importing required packages
import streamlit as st
import openai
- We will use ChatGPT model engine
text-davinci-003. This model can mimic human responses and even translate across languages. This model requires registration and an OpenAIapi_key, as explained in step (V.5) of this article. Now, add the following two lines to your script:
# Set the model engine and your OpenAI API key
model_engine = "text-davinci-003"
openai.api_key = "your_secret_key"
- Next we will create the
translate_texfunction which will take care of the translation process. This function will take whatever the user selects as target language and text input and return the translated text.
# Define a function to handle the translation process
def translate_text(text, target_language):
# Define the prompt for the ChatGPT model
prompt = f"Translate '{text}' to {target_language}"

# Generate the translated text using ChatGPT
response = openai.Completion.create(
engine=model_engine,
prompt=prompt,
max_tokens=1024,
n=1,
stop=None,
temperature=0.7,
)

# Extract the translated text from the response
translated_text = response.choices[0].text.strip()

return translated_text
- Now to bring it all together, we will create the
main()function that will call the needed functions to create our language web-based translation app. Let us setup this app, so the user will be able to translate text intoArabic, English, Spanish, French, German, Japanese, Russian, Korean, Chinese, Yoruba:
# Define the main function that sets up the Streamlit UI and handles the translation process
def main():
# Set up the Streamlit UI
st.sidebar.header('Language Translation App')
st.sidebar.write('Enter text to translate and select the target language:')

# Create a text input for the user to enter the text to be translated
text_input = st.text_input('Enter text to translate')

# Create a selectbox for the user to select the target language
target_language = st.selectbox('Select language', ['Arabic', 'English', 'Spanish', 'French', 'German', 'Japanese', 'Russian', 'Korean', 'Chinese', 'Yoruba'])

# Create a button that the user can click to initiate the translation process
translate_button = st.button('Translate')

# Create a placeholder where the translated text will be displayed
translated_text = st.empty()

# Handle the translation process when the user clicks the translate button
if translate_button:
translated_text.text('Translating...')
translated_text.text(translate_text(text_input, target_language))
- Now for our last step, we need to call the main function that we created
# Call the main function
if __name__ == '__main__':
main()
All done, now go ahead and save the file. We can give any name to our python file. I will call it Translator_GPT.py.
We can now run our translator app in our terminal.
streamlit run Translator_GPT.py
Once you run this command, a webpage in your default web browser will open where we will see our web-app.

Please go ahead and test the app for yourself. This is what it will look like.

III. Making our Web-app to the World
To make our app public, there are 3 easy ways.
We will look at how to make our available to everyone, using streamlit
III.1 Before Deploying to the Cloud…
We are now ready to deploy our translation app to the rest of the world. Before doing that, we need to do some house cleaning.
III.2 Install git
We need to install Git, our Version Control Tool which will allow us to run git commands on the terminal to upload our app.
III.3 Add a ‘requirements.text’ file
The cloud platform will need to know the python packages to install before they can start your app. We will specify that in our requirements.txtfile.
streamlit
pandas
III.4 Deploy your App to Streamlit Cloud
We will be using Streamlit to make our website public
III.4.1 Set up a GitHub Account
First, create a GitHub account here: Click here
III.4.2 Create a New GitHub Repository
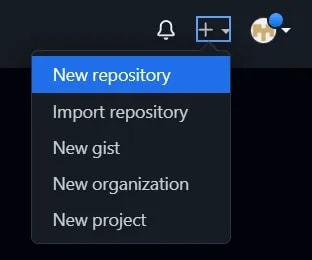
In the upper-right corner of any page, use the drop-down + menu, and select New repository.
Give the repo name you want repository name, -> click on Create repository. For now, no need to change any parameters, we will go with the default parameters.
III.4.3 Upload Files to your GitHub Repository
Now click on ‘uploading an existing file’.

Select your app.py and requirements.txt files inside the following page.
III.4.4 Set up a Streamlit Cloud Account
First we need to create a streamlit account. To do create a Streamlit cloud account here: Click
III.4.5 Create a New App and Link your GitHub Account
You will see a prominently visible "New app" button after logging in, which is self-explanatory once you see it.
Also, you will get a prompt asking you to "Connect to GitHub". Click on it and log into your previously created GitHub account to continue.

III.4.6 Deploy your App
On the next screen, search for the GitHub repository that you just created. Type the repo name in the area ->
Repository, which is specifically for this purpose.In the field ->
Main file pathchange toapp.pyClick the 'Deploy!' button.

III.4.7 Your Public App is Now Live on Streamlit Cloud!
After waiting for some time, your app will appear. Congrats! Here’s mine: https://share.streamlit.io/apotitech/translatorGPT/main/TranslatorGPT.py

Congratulations!!!!!! You have created your very first app.

Conclusion
Great job creating your very first app. Please go ahead and share your new app to others and let them test your app.
With that said ----------------> Happy Building!!
Thank you for taking the time to read this! If you like the article, please clap (up to 50 times!) and connect with me on LinkedIn , dev.to and Medium to remain up to speed on my future articles. 😅


Top comments (0)